Thursday, 11 May 2017

Our April Classes - Golden Oldies!!

Now let me be clear - I am talking about the Stamp sets in the title of this post, not us and our lovely ladies!  We were looking at our old retired sets and thought how wonderful it would be to use them again. Everyone was happy to try these old favourites. We had 3 new attendees, which was lovely, and they did an amazing job of all the projects!

Here is what Jeanette created -


 This card is made with Amazing Birthday stamp set and soon to be retired Designer Series Paper.  The class attendees had a choice of Calypso Coral or Pool Party and both turned out very pretty.

Her next project may look familiar - she did a similar one for the team swaps at Onstage - those had little "flag" post its, whereas these ones were the normal size post it notes. She had a range of papers to choose from - everyone was very impressed with the sliding butterfly closure!


The Up and Away bundle was what I used for this card - I made this at my upline Sue's class a couple of months ago - just love it!  I am so excited this stamp set and framelits are carrying over to the Annual Catalogue  - I have so many ideas for this set!  It is only available as a bundle though until the 31st May but will be in the new catalogue but as two separate items. If you would like to save 10% by buying the bundle, get in quickly! The ladies used the big shot to die cut the balloon  - love the effect.


My second card uses retired stamp sets - Both Way Blossoms and Love and Sympathy for the sentiment. I unfortunately had to make a sympathy card the previous week and used this set and loved the elegant simplicity of it.  The ladies had a choice of different sentiments, but all chose to use the beautiful sympathy sentiment and verse inside the card.


Our next class is on Friday 26th May and also on Friday 2nd June - would love you to come if you are local to us in Taylors Lakes, Victoria.  Click on the tab at the top of the page to contact us.

Thanks for visiting today - please leave a comment - we would really appreciate it!

Monday, 17 April 2017

Stampin' Up! Onstage - Sydney 2017

 Warning - this is a picture heavy post!!!

On April 8th we attended the demonstrator only event -  Onstage -  in Sydney at Luna Park - where we meet up with our team and another few hundred very excited demonstrators!  We received the new catalogue which begins 1st June,  and got to make some projects using items from it.  We also have people presenting - how to use some of the new items from the catalogue, tips and other information.   We saw display boards featuring some of the new products also. It is a full day - this year check in was from 7.30 and it finished around 4.30! Here are some photos of the day -

Our group - not called the Crazy Crafters for nothing - we are LOUD!


              Jeanette and I ready for an exciting day...


A bit of fun at lunchtime with Jeanette and Sue, our upline. They were trying to get me on scary rides - but they had absolutely NO hope!!!


Jeanette and I receiving our free stamp set on Prize Patrol. We received many giveaways on the day - all from the new catalogue!!!


Myself, Sue and Jeanette


The beautiful view from Luna Park. We were so lucky with the weather when we were  up in Sydney..


One of my favourite parts of these events is the swaps. Jeanette and I both made team gifts for our group - 38 of us! - and received some lovely gifts as well.  We also made 30 other items to swap with other demonstrators. It is - as one of the demonstrators said - joyful chaos! - as we swap and get some amazing ideas in return.

For our team gifts I made these Kit Kat holders - always good to have chocolate wherever you are!


These were very easy to do  - I got the very clever idea from a blog I follow - a UK demonstrator, Samantha Clayton - Mixed Up Craft.  Thanks Samantha for the idea!  I changed the measurements to make a smaller one as I had so many to make (I used the share bag sized Kit Kats)  and decorated mine completely differently.  Contact me if you would like my measurements .  I used various cardstock, the stitched framelit dies (love these!), the "For You" and the heart comes from the MIni Treat Bag thinlets, and the ribbon is our beautiful 1/8" silver ribbon.

For the other swaps, I made post it note holders, watercolouring one of the SO cute images from the Bella and Friends stamp set. The Designer Series Paper is from the Brights DSP Paper stacks - all these stacks are sadly retiring and I think all but 2 colour families have sold out. Will be very sorry to see these go. 


Jeanette made these very useful post it tab holders - those post its came in very handy when we were marking our new catalogue pages with our "must have" wish list items! The butterfly (she used the Elegant Butterfly and Itty Bitty Butterfly punches)  slides and opens the holder - very clever Jeanette!


For Jeanette's swaps she made these beautiful tags, using the Dragonfly from the Dragonfly Dreams bundle. Have seen some lovely things done with this stamp set and matching dies. She also used the stitched framelit dies and paper from the Designer Series Paper Stacks.  The punch for the sentiment is the Classic Label punch.  I think these tags look so pretty!


 Hope you have enjoyed looking at the pics from our trip to Sydney. If you would like to come to the next one - in November - and in Melbourne, I would love you to join  my team. Please contact me if you would like more information.

Thanks for visiting!!


At Our March Class...

Hi everyone! Things have been a little bit quiet on the blog as you may have noticed, but hopefully that will change from now on.  We are a little bit late in posting what we did in class last month, but thought you might like to see.

One of our ladies wanted an Easter frame and Jeanette came up with this beauty - the lady loved making it for her family! She used the Stitched Framelit dies, various cardstock from the Subtles Collection, embellishments, embossing folder  - all from Stampin Up! and some non SU! stamps and dies she had in her stash.


Jeanette also showed all the ladies how to use the Gift Bag punch board and they made 2 bags, for Easter or another occasion.

The class attendees who didnt make the frame also made 3 cards - 2 of which used my favourite set at the moment.

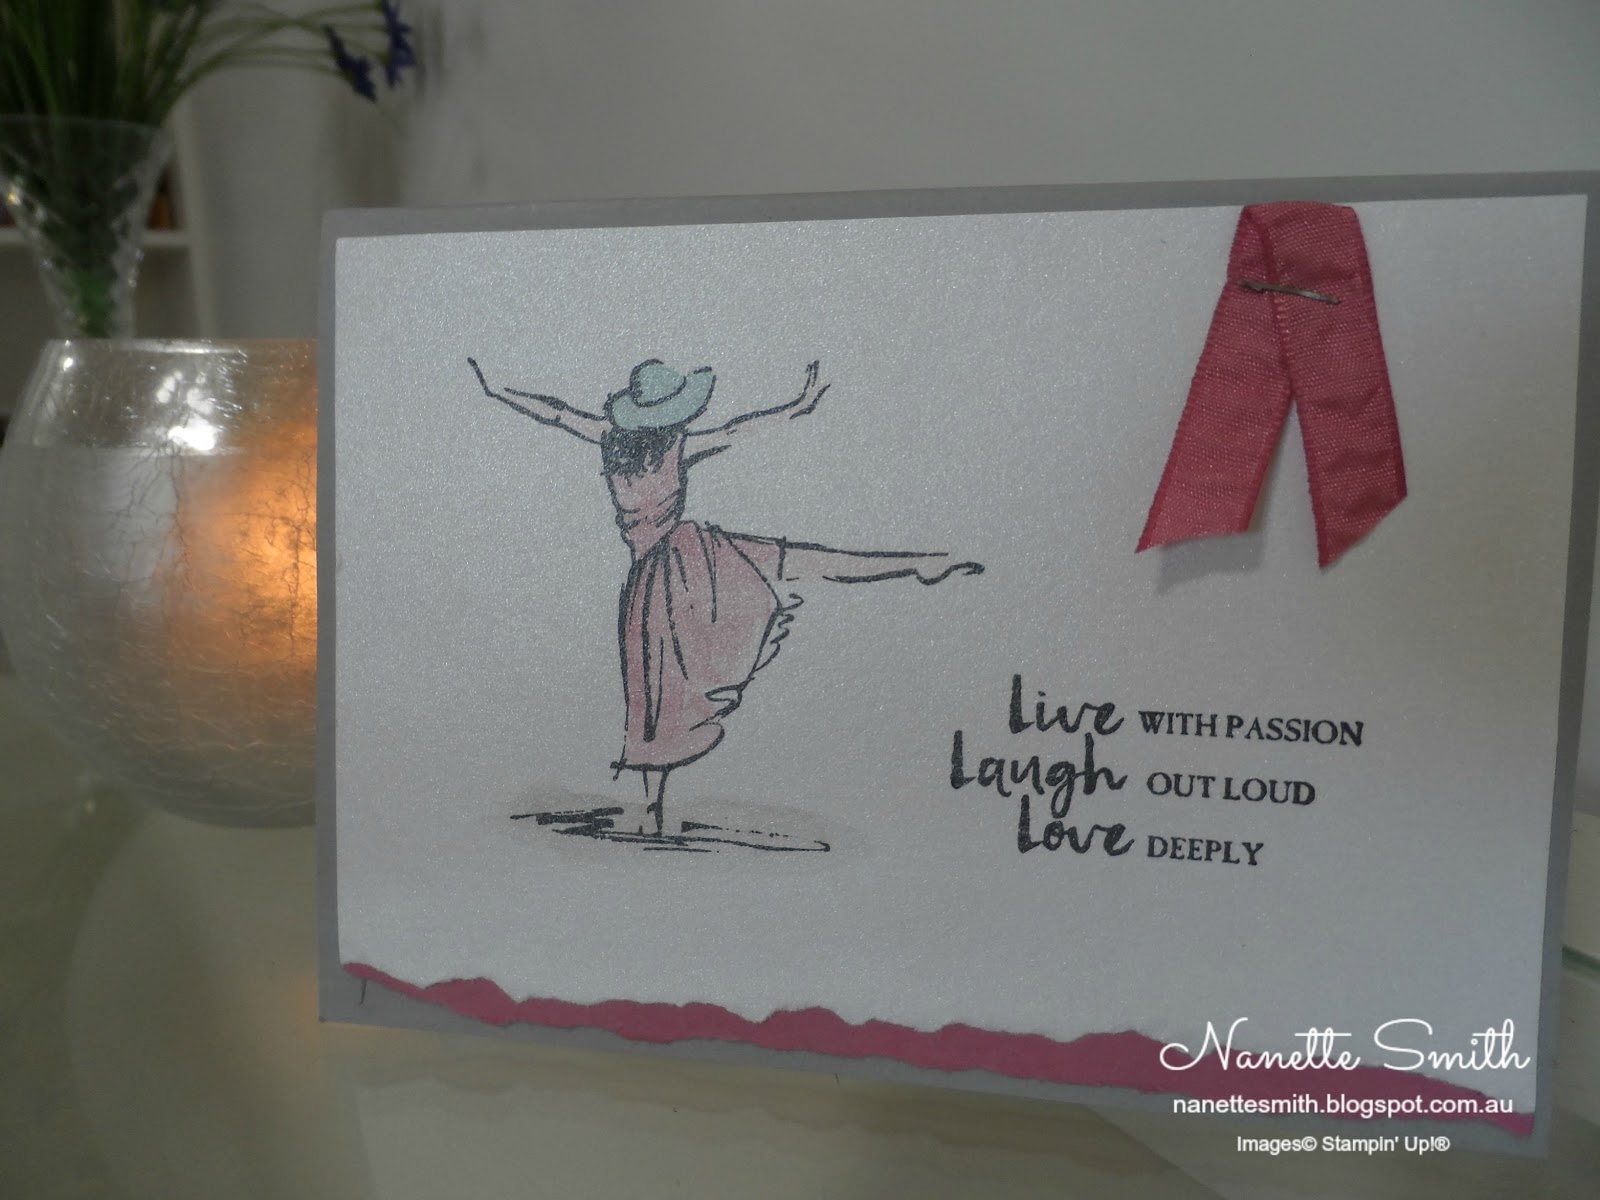
The first is using the Beautiful You stamp set - so many lovely images in this set - and sentiments too.   We tore the bottom of the Shimmery white cardstock before stamping and watercolouring the dancer. The Shimmery cardstock is fantastic for watercolouring - it doesnt "pill" and has a beautiful shimmer effect. Click on the picture and you can see how pretty it looks. This card was inspired by the very talented Michelle Last - LOVED her card, so I didnt change much at all!


The 2nd one uses a different image from the same set and her dress and hat are paper pieced - stamp the image onto a piece of patterned paper and then cut parts out such as her dress and hat which I have done here and place it on another stamped image. Looks amazing - love this Floral Boutique paper - it's on the retirement list so if you want it don't delay!!


The final card was one of those cards we all need but sometimes struggle making - masculine cards!  I found this one on Pinterest and changed it up using different stamp sets and washi tape. I think this is a very versatile design for both male and female cards and can see it with a flower instead of the ship and soft pastel cardstock.  I dont know who created the original card,  but if it was you let me know and I will be happy to acknowledge you  - and thank you for the idea!


It was another fun night with a lovely group of ladies - we hold classes once a month and if you are local would love you to join us.  Contact myself or Jeanette for more details.

Thanks for stopping by - will be back soon with some pics from our recent trip to Sydney to attend SU! Onstage.  Another fun filled day!


Tuesday, 17 January 2017

IT'S SALE-A-BRATION TIME AND A NEW OCCASIONS CATALOGUE!


The Occasions Catalogue is full of exciting new stamp sets, dies, accessories and papercraft supplies, and the Sale-A-Bration Brochure has a gorgeous selection of rewards you can claim for free! For each $90 spent between 4th January – 31st March 2017 you can choose a free item from the Sale-a-Bration Brochure!  Who doesnt like freebies!


Contact me if you would like a copy of both catalogues - you wont be sorry you did!

Saturday, 17 December 2016

Christmas gift cards for a special someone...


Today I wanted to show you these adorable little sets of gift cards I have made. (click on pic to enlarge) . The original idea for the cards came from a U.K. demonstrator, Helen Griffin in this post -  - love her work - check her out, she does amazing things!  I thought they needed a little box to put them in, so I worked out the measurements for the boxes which have reinforced sides so are quite sturdy, and they also fit envelopes I made with the Envelope Punch Board.  I have put 4 in each box, but you could fit more in if you dont use dimensionals on the card circles. They look even better in real life and would make a really nice small gift for someone special.

Of course these are Christmas ones, but you could change the greeting to suit any occasion. And even better, the Decorative masks I have used are on sale in our End of Year Clearout, but get in quick - the sale ends 3rd January 2017 or when stocks run out!!  The sentiments come from a wonderful set - Tin of Tags - 16 photopolymer stamps in the set and not all of them Christmas - a set I am getting a lot of use from. For any of the supplies I have used today you can order thru my online store, or contact me and I will be happy to place an order for you.

In case you are interested in making these yourself, here is how I made them... (As this is my first tutorial, please contact me if you are unclear on anything!)

Cards -    Cut a piece of cardstock 3" x 6" ( I used Elegant Eggplant, Real Red, Garden Green and Smokey Slate). Score at 3".  The Whisper White card on the front measures 2 3/4" square - you can use the masks on a large piece of WW and then cut to size or stamp on the smaller size. Using Versamark, press the pad enthusiastically all over the mask/Whisper White and then emboss with Silver Embossing Powder. Tip - use washi tape to hold down the mask.

Stamp your sentiment on WW cardstock, again with the Versamark ink and emboss.  Punch out using the 1 3/4" punch and then use the 2" punch with the Silver Glimmer Paper. Layer the circles and attach the greeting to the card using dimensionals.

Envelopes -  Use the measurements for a  3 x 3" card on the Envelope Punch Board.

Box -   

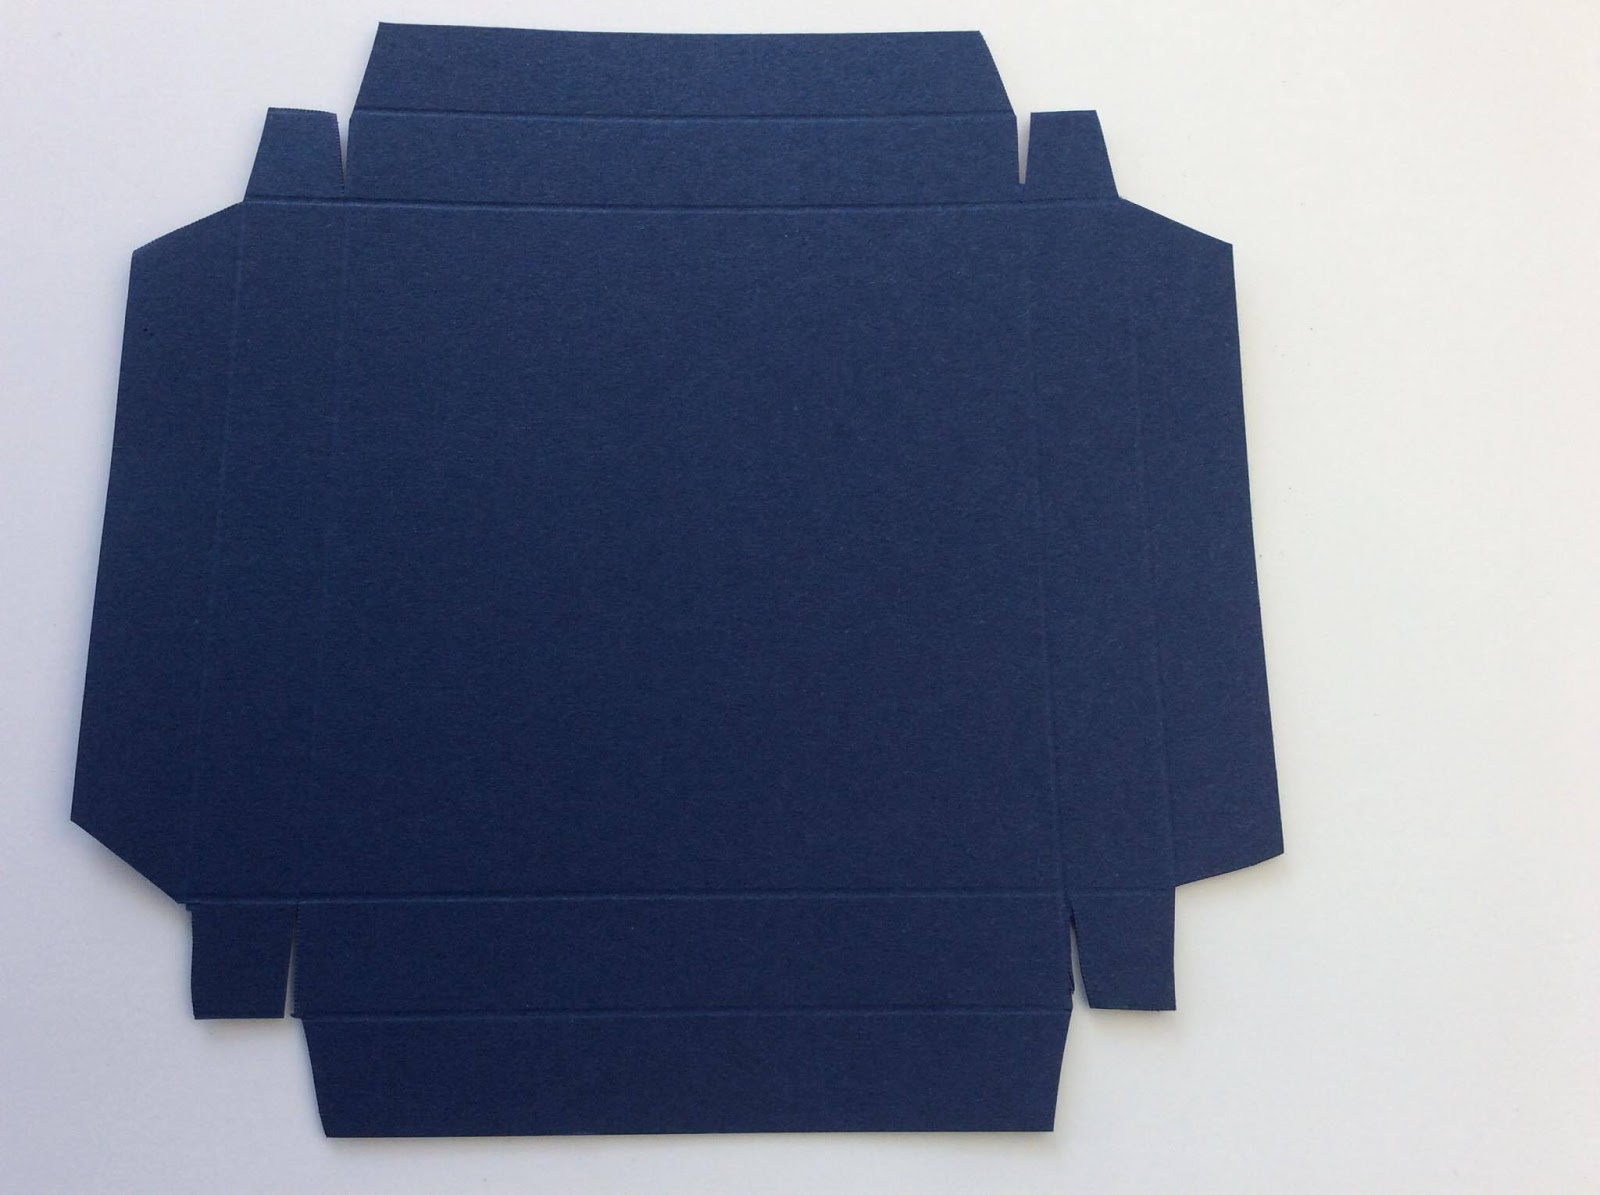
Lid -   Start with a piece of card 5 3/8"square.  Score at 1/2" and 1" on all 4 sides.  Using scissors, cut up to the second scoreline on both the small squares. Remove the two squares on the end and the bottom square next to them. Take a small "sliver" off the remaining square.  Do the same on all 4 sides and angle the ends of the long rectangle.  Hopefully these photos will show you what you should be left with.


Fold and burnish on all score lines.  Place strong adhesive, such as our Fast Fuse -  liquid glue is fine too, - along the angled rectangle and fold in on the first score line. Then using the glue/tape again on the notched out squares, attach to the rectangle sides, on the inside,  to make the box.

Stamp and emboss the sentiment and layer the same way as the cards and attach to the lid of the box with dimensionals.

Base - Start with square card measuring 6 3/8" less 1/16" - this will ensure a snug fit.  Score at 3/4" and 1 1/2".  Complete in the same way as the lid.

When you or your recipient have used the cards, the box can be reused - a perfect size for jewellery or small chocolates!

I hope you have enjoyed my first tutorial and if you make these, I would love to see what you create!


Wednesday, 23 November 2016

Our First Market Stall


Jeanette, my fellow demonstrator and I,  had our first market stall at a local fete last month.  It was a really windy day, but luckily we were situated inside - windy days and papercraft are not a good mix!


We had a wide range of items for purchase on the day.  We are very happy to take orders, so if there is anything you are after,  contact us and we will be happy to make them for you.

We have our next fete at the Taylors Lakes Primary School on Friday December 2nd from 5 pm, so come along if you can and buy some handmade gifts for Christmas or birthdays, or just for yourself!  Great for those teacher's gifts too!


Tuesday, 25 October 2016

Class Night

My fellow demonstrator Jeanette and I hold classes every month and have a lovely group of ladies come to make some projects and have a great social evening.  We will be offering the monthly class over two dates in the month and we would love you to join us - contact us for more details.

Here is a photo of this month's class - we had 2 ladies who hadn't crafted before and they did a fantastic job and have already booked into our next one!


These were our projects for this month -


The little milk carton showcases the absolutely gorgeous Floral Boutique Designer Series Paper - just love this paper!  It is also part of SU!'s special DSP offer -  Buy 3 Get One Free - see tab above - "Current Promotions" -  for more details - but be quick - it finishes 31st October.  The cards feature the stamp set  Grateful Bunch - so easy to cut out using the matching punch for the flowers - and the very versatile  Swirly Scribbles Thinlits.  These thinlets co-ordinate with the Swirly Bird Stamp Set. The ladies could choose which colours they wanted for the cards and came up with some great combinations.


The very clever self closing box looks great and holds quite a few chocolates or is ideal as a gift card holder, especially with the festive season nearly upon us.  The card is made with the  Detailed Floral Thinlits, part of the Floral Boutique Suite - everything you need from DSP, stamps, Washi tape and twine - all co-ordinating perfectly. 

We hope you enjoyed looking at our October class projects.

Thanks for visiting our blog - back soon with some photos of our recent craft stall....