Saturday 9 July 2022

FIRST CARD CLASS FOR SUCH A LONG TIME!

 Last night I was so happy to host a card class  again- has been a long time coming but so glad I could do it!  The ladies who came were just as happy to be there, and it was a lovely night.  Here is what we made....


This card I thought was ideal for the men in my life and even better, used up a little of my many scraps!  It uses the stamp set The Right Triangle and the matching dies,  and also the sadly retired Playful Alphabet dies, which after adding a foam sheet  behind the paper I die cut them out.  I stamped the triangles in Versamark,  to give a soft tone-on-tone look,  with different patterns from the stamp set and arranged them randomly on the front of the card.  The Birthday sentiment is also from a retired set  - Word Wishes - and I heat embossed it in white.  Love how they turned out.

The 2nd card was just so elegant I thought, ideal for many different occasions - think it would make a lovely sympathy card too.


The stamp set here was the Encircled in Friendship  - it has lovely images and sentiments.  On a white card base I cut a strip of Night of Navy and attached to the left hand side. Then cutting a 1/4" strip of Basic White cardstock,  attached that to the navy strip.  A small square was stamped with one of the flower images and heat embossed with clear embossing powder and coloured with watercolour pencils and a blender pen to smooth out the colouring.  This was backed again in the Navy and added with dimensionals. and a few small pearls.

The final card was using (again) a retired bundle called Birds & Branches.  Must confess I bought the set mainly cos of the beautiful dies - so many possibilities!


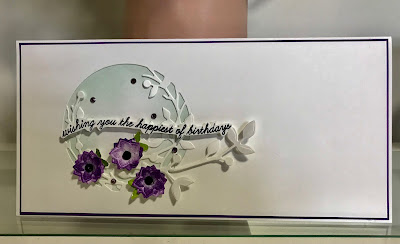
Using Gorgeous Grape I stamped the flowers 9 times, not re inking between 3 flower images, so I obtained different shades of colour. I then layered three of these flowers, offsetting a little to give fullness and repeated this for the other 2 flowers.  The little branch was tucked into the die cut, and I used Pool Party ink with the blending brush to create some colour in the background. The sentiment  (from the Quite Curvy stamp set) was stamped and fussy cut and adhered with foam strips.  The ladies all did different colours and they all looked fabulous.

Thanks for visiting and hope you can get into your craft room soon!

Nanette. 

PS. Many thanks to Jill , Tracy and Emma for the inspiration. Didnt change too  much as I thought their ideas were just perfect!


Saturday 21 May 2022

1ST BIRTHDAY CARD FOR OUR LITTLE GRANDAUGHTER.


Recently our first grandchild turned 1 - cant believe where that year went - and I wanted to do a special  card for her 1st birthday.

I used a retired set, Fable Friends,  which hadn't seen any ink - why I dont know cos I think it is so cute, and so reminiscent of Beatrix Potter characters which I love.   I made a slimline card and used the Eclipse technique with the letters - very easy to do and so effective.

First I stamped the images on Basic White and coloured them using different Blends.  Then I used the Large Letter dies (also sadly retired) to cut out her name.  To the card base, I layered a piece of Balmy Blue cardstock and then glued the Basic White layer on top.  I then put dimensionals on the back of the letters to raise them up and fitted them into the  die cut spaces.  You get just a glimpse of  the blue peeking through. 

A hint - if you do this dont forget to save the little cut out bits - eg on the A and the R on this card. These little tiny bits are glued to the Balmy Blue  layer.

Hope you enjoyed seeing this card - my first try at an Eclipse card and was so pleased how it turned out.  Give it a go !

Till next time...

Nanette. 

Tuesday 1 March 2022

STILL HERE!

 It has been a long while between posts - due to COVID restrictions we have been unable to have classes, but hopefully now most restrictions have lifted we can get back to normal soon.

Haven't been doing much crafting since Christmas,  it's been more about organising the craft room itself, and sorting through retired stamps to sell.   I need to get creative again tho - has been too long!

Hope you have been busy crafting!

Nanette.


Thursday 8 July 2021

JUNE/JULY CARD CLASS

 8.7.21

Hi!  We had to cancel card class last month due to COVID restrictions here in Victoria, but they relaxed sufficiently that we could have a class this month.

Here is what I made:


I used the beautiful die from Flowering Vines,  - attaching adhesive sheets to the back of Basic White and die cutting the circle die.  I then used either Night of Navy, Gorgeous Grape or Blushing Bride ink with the blending brushes, to create an ombre effect using just one of these colours.  I then peeled the adhesive sheet and placed it on a layer of white, and  attached this to a co-ordinating piece of card stock and then attached that to the base card with dimensionals.   The sentiments were from the matching stamp set, Vine Designs and I love the simplicity of the font.  Added some bling and I was done! Very elegant and gorgeous!!  Inspiration was from Kylie Bertucci - thanks Kylie. 


And from Jeanette - 

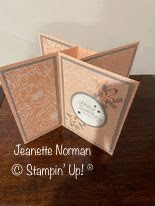
"I've been wanting to have a play with making a tower card for some time now.  There are so many around on Pinterest at the moment in various sizes and they look so amazing!  For class, I decided on a compilation of the many cards and used a 5 x 7" base.  These cards are fun to make and yet look very impressive".  Jeanette offered the card in  two colour-ways, both were very pretty. . 


Hope this has given you some inspiration, thanks for visiting and happy crafting!

Nanette


Tuesday 25 May 2021

MAY CARD CLASS

 Hi!  We had a lovely class again, with a new lady joining us (welcome Julie!), and it was great to catch up with everyone.

For my card this month I loved a card by my friend Fiona Bradley and decided to use that as inspiration.  I offered it in two colour ways and I think they both look so pretty.  

Using the stamparatus, I inked up the stamp with Versamark and then Soft Suede, and then heat embossed with clear embossing powder.  I then cut the flowers out with the co-ordinating dies.  Then using our inks and an aqua painter, I coloured the image.  For the blue card I used Misty Moonlight, Garden Green and Hello Honey.  Rococco Rose, Old Olive and Daffodil Delight were used for the pink one.


I cut a 3/4" strip of Basic Black for the blue card and Early Espresso for the pink. I adhered it to a piece of Basic White and attached to the front of the card base using dimensionals.  I then also used dimensionals to raise the flowers.  For the sentiment I stamped on black or Early Espresso to match the strip and heat embossed in white and fussy cut.  This also was raised with dimensionals.  I added a few rhinestones too, cos you just have to have some bling!


Jeanette did two cards this month -  the first is a peek a boo card - it has a bit of a surprise factor for the recipient when they open it!


Her next card was made using our laser cut paper - so pretty and such a simple way to make a quick card!


Come join us at class and learn new techniques, make some projects and enjoy the company of a great group of ladies.  Get in touch if you are interested or want more information.

Thanks for visiting - and happy crafting!


Tuesday 4 May 2021

JOIN MY TEAM - NEW JOINING SPECIAL

 Hello! It's the start of the new annual catalogue TODAY and to celebrate,  Stampin' Up! have a great joining special for the month of May!  It is worthwhile if you intend spending $169 or more, because that is what you pay to join BUT  for that $169 you get to choose $283 worth of your choice of products from any current catalogue and the clearance rack, with free postage and a business pack!!


You may have some questions - here are a few points that might answer them - if not please contact me!

  • You do NOT have to sell  or make it your business if you join- you can just buy for yourself or family/friends. and save between 20%-25% on your purchases. But if you do decide however in due course , that this might be for you,  there is a lot of support through me and SU! to help you achieve your goals. 
  • You can leave at any time - there IS a minimum spend each quarter to stay as a demonstrator  but if you don't reach this there are no penalties at all for leaving., and this is done automatically by Stampin' Up!, so no "resignation" is required by you. And ofcourse you are free to rejoin at any time in the future.
  • Benefits are the savings as above, early access to specials, promotions, catalogues and to be part of the SU! community - lots of support and ideas.  And Demonstrator only events - 2 in person events were held each year previously but with COVID, these events are currently held online.  The in person events were such fun - scroll down to see posts of past events. Imagine hundreds of crafty SU! demonstrators together - crafting, meeting new people, and LOTS of free products!
Ofcourse, I am more than happy to welcome you as a valued customer if this promotion does not interest you.

You can click on the image to the right to see the new catalogue, or contact me to receive a hard copy.


Enjoy browsing!

Thanks for visiting


Thursday 29 April 2021

APRIL CARD CLASS

 We had a lovely class this month and we made the following things....

Jeanette loved this card from the talented Alisa Tilsner and she recreated it, showing different techniques with ink blending for the background,  splatters, die cutting and heat embossing. A very versatile card which could be used for practically any occasion by just changing the sentiment.  Every card the ladies did was different and all looked so good!


My son got married in March, and I gave the bride to be a card on the morning of the wedding - from future mother in law to future daughter in law.  She loved it - glad I gave it to her before our make up was done tho, cos we were as bad as each other with the tears!  I absolutely loved the card, so made it for class, but this time with a birthday sentiment.  I also had Mother's Day sentiments on hand they could use if they wished.  Again, each card was different depending on the combination and amount of the foliage.  Love seeing what people do with an idea!


The 2nd card I did was from an idea from Bruno Bertucci - he calls it the Scrappy Strip technique.  So effective and it just uses scraps as the name suggests! Each card looks unique depending on the colours and the thickness of the scraps. I struggle with masculine cards and I thought these two would be perfect to add to my stash.


Hope you have enjoyed seeing what we made this month - would love to see you at class - message me if you would like further information.

Thanks for looking....happy crafting!